X-ACT Manual Operation
Operation
Before connecting the app, make sure the X-ACT Bridge Controller has scanned all the simulators.For that, power all the simulators first, then the X-ACT Bridge Controller. The initial scan takes about 10 seconds.
Then connect to the X-ACT Tablet to the Bridge Controller via WiFi or Bluetooth as appropriate and start the app.
If you have more than 10 devices connected, click on the menu and click on "10/16 Units" to enable the 16 Units control mode. Clicking the "10/16 Units" menu alternates between the two modes. If you have 10 simulators or less, make sure they use addresses between 0 and 9 (included) and you can use the "10 Units" mode.
In the app, click on the Connect button. In a few seconds, the screen should be populated with the simulators that are connected to the X-ACT Bridge Controller. The screen shot below shows two simulators connected.

Figure 4: X-WBridgeWiFi app main page, connected
The display indicates at the top the IP address of the X-ACT Bridge Controller and below that the "Connect" (or "Disconnect" if the app is connected) button, a label indicating the ID String and software version of the X-ACT Bridge Controller and the "Scan" button.
On the next 10 (or 16) lines, from the left: the simulator's address and its ID string, indicating the type of device it is and the firmware version, or "Off" if there is no powered simulator at this address, then the state of the simulator (only for those that are powered), then the two control buttons to the right.
Notice that the left button indicates "ARM" for the two units that are connected, and IDLE for the units that are disconnected. We will get back to this later.
Initially, the simulators will be in IDLE state. Press the ARM button, the simulator's state changes to ARMED and the FIRE button is now enabled.
To fire the simulator, click on the FIRE button. The state will change to FIRING, then FIRE DELAY and after a few seconds it will return to ARMED.
Disconnection
If the normal power-up sequence cannot be followed (powering up the simulators first, then the X-ACT Bridge Controller), it may be necessary to click on the "Scan" button to force the X-ACT Bridge Controller to restart the power up scanning sequence. Pressing the Scan button will disconnect the app from the X-ACT Bridge Controller. This is normal. Simply wait 10 seconds before reconnecting to make sure the scanning sequence is complete. Note that to use the Scan button, the app needs to be in the connected state to the X-ACT Bridge Controller.It may happen that a simulator that is at the edge of the useful range randomly disconnects from the X-ACT Bridge Controller. The indication will be that the app stops displaying the state of that simulator. If that happens, it may be possible to reconnect without rescanning simply by clicking the IDLE button for that simulator, but it is best to resolve the range issue for reliable operation.
Rename Simulators
When a large number of simulators are used, it may be preferable to display useful names instead of displaying the simulators ID strings.
To rename the simulators in the app, click on the menu then on "Show Names/IDs". This menu toggles the display of names or ID strings, then click on the menu and then on "Edit Names On/Off". A label at the bottom of the screen indicates when you are in Edit Name mode.
To change the name assigned to a simulator, click on the label currently displaying "Undef" for that simulator. Enter the name you want displayed and click on Ok.
When done, click on the menu and then on "Edit Names On/Off" to turn off the edit mode.
Simulator Fault
Simulators with firmware 2.0.0 and up can display a fault status when some parameters are exceeded or if the battery voltage is too low. When in Fault mode, the simulator's status will be displayed in red as in the picture below.
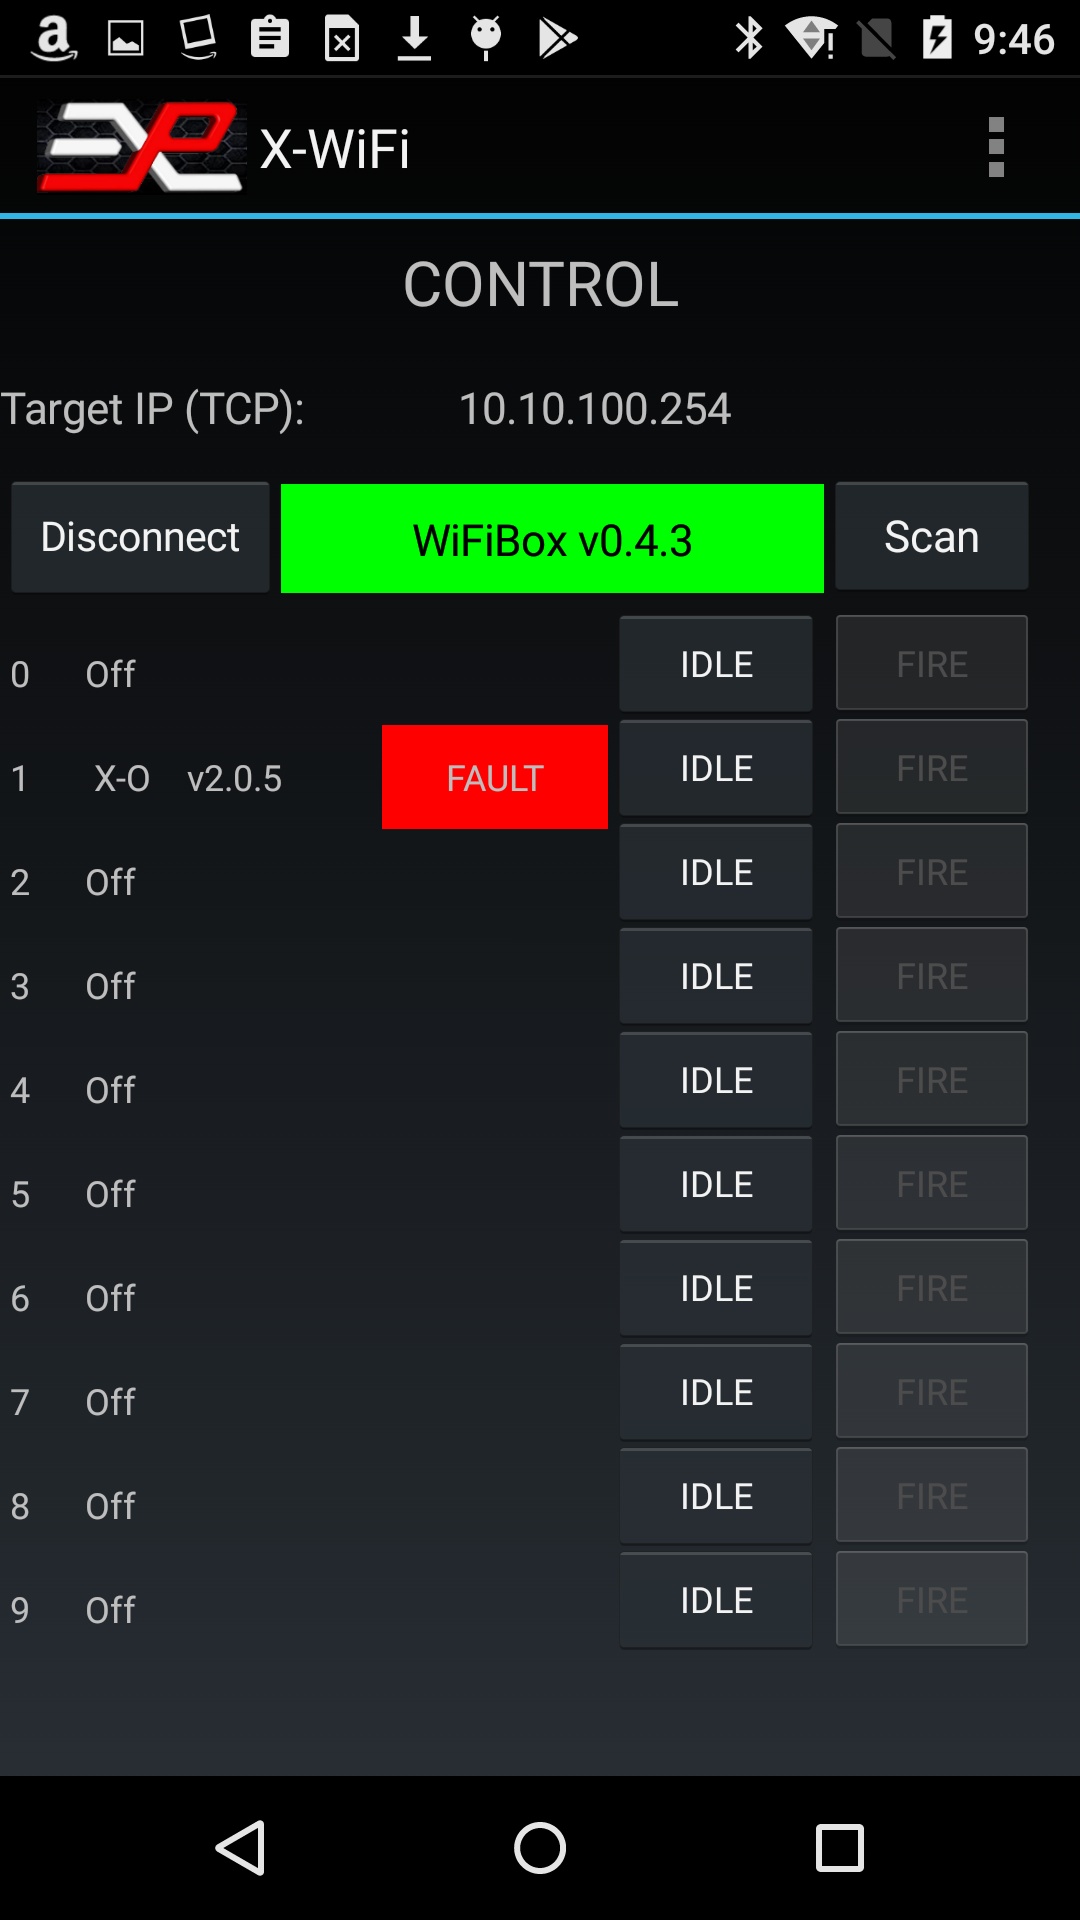
Figure 4a: Fault Status
In the example above, the simulator at address 1 shows a Fault condition.
To display the type of fault, simply click on the red "Fault" status label. A popup list will indicate the type of fault and give you options to clear or ignore the fault.

Figure 4b: Fault Report
In this example, the popup shows that the simulator faulted because of valve Over Current.
By clicking on the "Clear Fault(s)" message, you can return the simulator to normal operation. However, unless the cause of the fault has been eliminated, it is very likely to come back. Look in the Settings section for more information on fault troubleshooting. If you hit Close, the popup will close without further action.